ViewGroup
reference:
https://developer.android.com/reference/android/view/ViewGroup
https://developer.android.com/guide/topics/ui/layout/linear?hl=ko
https://developer.android.com/guide/topics/ui/layout/relative
ViewGroup 개념
ViewGroup이란 다른 View를 자식으로 가질수 있는 특별한 형태의 View입니다. Layout, View containers의 부모 클래스이기도 합니다. ViewGroup은 LayoutParam 클래스를 포함하고 있는데, 이는 ViewGroup이 자식 View들에게서 어떤 속성을 받아 사용할 것인지 정의하는 역할을 합니다. 흔히 "android:layout_" 으로 시작하는 속성들이 이것에 해당합니다.
ViewGroup 중 대표적인 Layout들
Android를 개발하면서 흔히 접할 수 있는 layout은 다음과 같습니다.
LinearLayout
RelativeLayout
FrameLayout
ConstraintLayout
위 layout들의 차이점을 분명히 인식하고 있어야 어느 상황에서 적절히 사용할 수 있는지 알 수 있을 것입니다. 구체적으로 어떻게 작성하는지는 참조 링크로 대체하겠습니다.
LinearLayout
가로 혹은 세로 방향의 orientation("android:orientation" 속성)이 주어지고 그 단일 방향으로 모든 하위 View를 그립니다. 모든 항목은 순차적으로 배치되기 때문에 가로 방향의 경우 한 행에 한 View만 놓이게 됩니다. layout_weight 속성을 통해 가중치를 부여할 수 있습니다. 세로 방향인 경우 하위 View의 height를 0dp로 부여하고 weight를 1로 적은후, 나머지 View에는 weight를 부여하지 않으면 부여된 View가 남은 화면을 채우도록 확장됩니다.
RelativeLayout
하위 View들의 위치가 형제 View나 부모의 위치를 기준으로 설정될 수 있는 layout입니다. 주의할 점은 서로 상충되는 속성값을 갖도록 부여해서는 안된다는 점입니다. 예를들어 RelativeLayout의 height가 wrap_content인데, 자식 View가 ALIGN_PARENT_BOTTOM 속성을 갖도록 해서는 안됩니다. 아래는 주요하게 사용되는 주요 속성들입니다.
android:layout_alignParentTop"true", makes the top edge of this view match the top edge of the parent. android:layout_centerVertical"true", centers this child vertically within its parent. android:layout_below android:layout_toRightOfFrameLayout
화면의 부분 혹은 전체를 하나의 View로 덮어 씌우도록 의도된 layout입니다. 일반적으로 하나의 자식을 갖도록 하는데, 자식들의 위치를 조절하기가 쉽지 않기 때문입니다. 다만, "android:layout_gravity" 속성을 통해 자식들의 위치를 어느정도 지정할 수 있습니다. 자식들은 stack처럼 아래에서 부터 위로 올라가는 형태로 겹쳐집니다.
ConstraintLayout
자식 View들을 유연하게 배치할 수 있는 layout입니다. 아래와 같이 다양한 옵션을 제공합니다.
Relative positioning
Margins
Centering positioning
Circular positioning
Visibility behavior
Dimension constraints
Chains
Virtual Helpers objects
Optimizer
Relative positioning
left, right, top, bottom 혹은 baseline을 기준으로 형제간에 상대적으로 위치를 지정할 수 있습니다.
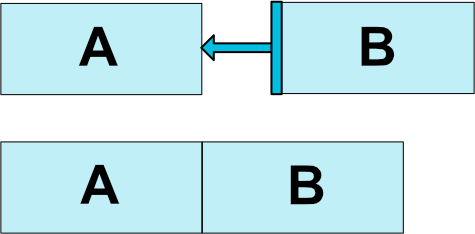
Fig. 1 - Relative Positioning Example
A의 right를 기준으로 B의 left가 정해진 예시입니다. B의 "app:layout_constraintLeft_RightOf" 속성 값을 A의 id로 부여한 경우입니다. 같은 레벨의 형제 View나 부모만 값으로 가질 수 있습니다.
Margins
left, right, top, bottom를 기준으로 constraint target으로부터의 margin을 부여할 수 있습니다.
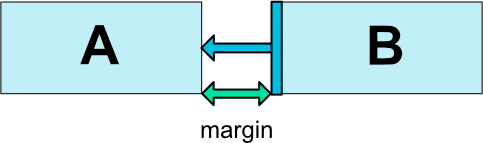
Fig. 3 - Relative Positioning Margins
Centering positioning and bias
Constraint target을 기준으로 위치에 대한 bias를 부여합니다.
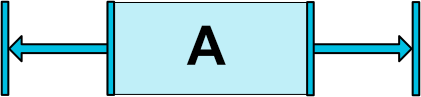
Fig. 4 - Centering Positioning
위는 A의 left와 right가 동시에 적용하면 기본적으로 그 중간에 위치하게 된다는 것을 보여줍니다.

Fig. 5 - Centering Positioning with Bias
Circular positioning
Circular한 기준으로 위치를 정할 수 있습니다.
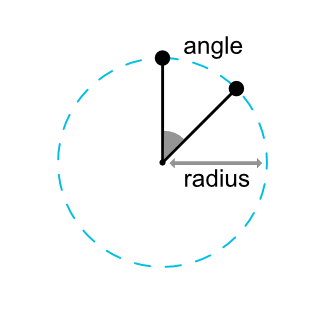
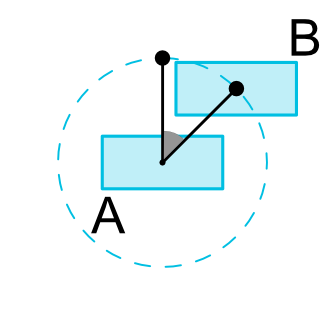
Fig. 6 - Circular Positioning
constraintCircle 속성으로 기준을 정하고, constraintCircleRadius와 constraintCircleAngle을 정합니다. 위는 12시를 기준으로 45도 만큼의 angle이 주어진 예시입니다.
Visibility behavior
Constraint target이 View.GONE 처리 된 상태이더라도 여전히 그 자리에 있는 것처럼 동작합니다. 실제로 그 것이 보이지 않더라도 말이죠.
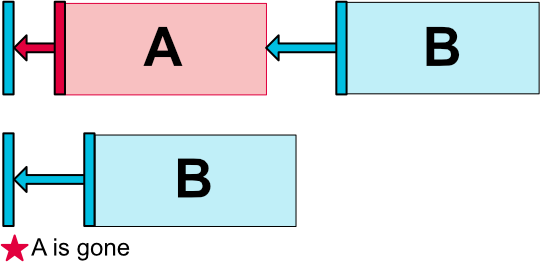
Fig. 7 - Visibility Behavior
위 예시는 A가 gone 처리 되었음에도 B의 left가 여전히 존재하는 것처럼 정상적으로 동작하는 것을 보여줍니다. 다만 A가 A의 left로 대체되었을 뿐입니다.
Dimension constraint
Layout의 크기를 minimum, maximum 값으로 부여할 수 있습니다. wrap_content와 함께 사용되어야 하겠죠. min(max)Width, min(max)Height로 지정합니다.
Layout의 높이와 너비는 세가지로 부여될 수 있습니다.
1. 특정한 dimension 값
2. WRAP_CONTENT
3. 0dp (MATCH_CONSTRAINT와 같음)
주의할 점이 있다면, ConstraintLayout에의 자식들의 크기에는 MATCH_PARENT가 권장되지 않습니다. 비슷한 속성으로 MATCH_CONSTRAINT를 사용하는데, 이는 left, right, top, bottom의 constraint target이 부모로 지정되는 효과를 갖습니다.
1.1 버전 이후부터는 WRAP_CONTENT의 크기를 갖는 자식 View에 대해 constraint target을 침범할 것인지 여부를 정할 수 있습니다.
<app:layout_constrainedWidth="true"> 속성이 부여된 자식은, left와 right를 침범하지 않습니다. 반대로 height에 대한 속성도 있습니다.
Percent
또한 크기를 percent로 부여할 수 있습니다. 크기가 0dp(MATCH_CONSTRAINT)로 지정되고,
<app:layout_constraintWidth_default="percent">
<app:layout_constraintWidht_percent="0.5">
위 속성들이 정의된다면, 이 View의 너비는 left와 right 사이에 너비의 정확히 절반을 가지게 될 것입니다.
Ratio
너비와 높이를 서로의 비율로 부여할 수 있습니다. 아래 Button은 높이가 너비에 맞춰 1:1이 되도록 설정한 예시입니다. (width:height)
<Button android:layout_width="wrap_content"
android:layout_height="0d"
app:layout_constraintDimensionRatio="1:1" />
Chain
양방향으로 서로 연결된 View들의 관계 Chain이라고 말합니다.
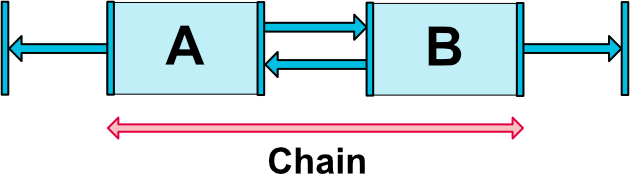
Fig. 9 - Chain
이 예시는 A와 B가 서로에게 chain 되어 있습니다.

Fig. 10 - Chain Head
가장 앞쪽(혹은 위쪽)에 있는 요소가 chain의 head가 됩니다.
Chain Style
Chain된 View들이 어떻게 배치될 것인가에 대한 style 입니다.
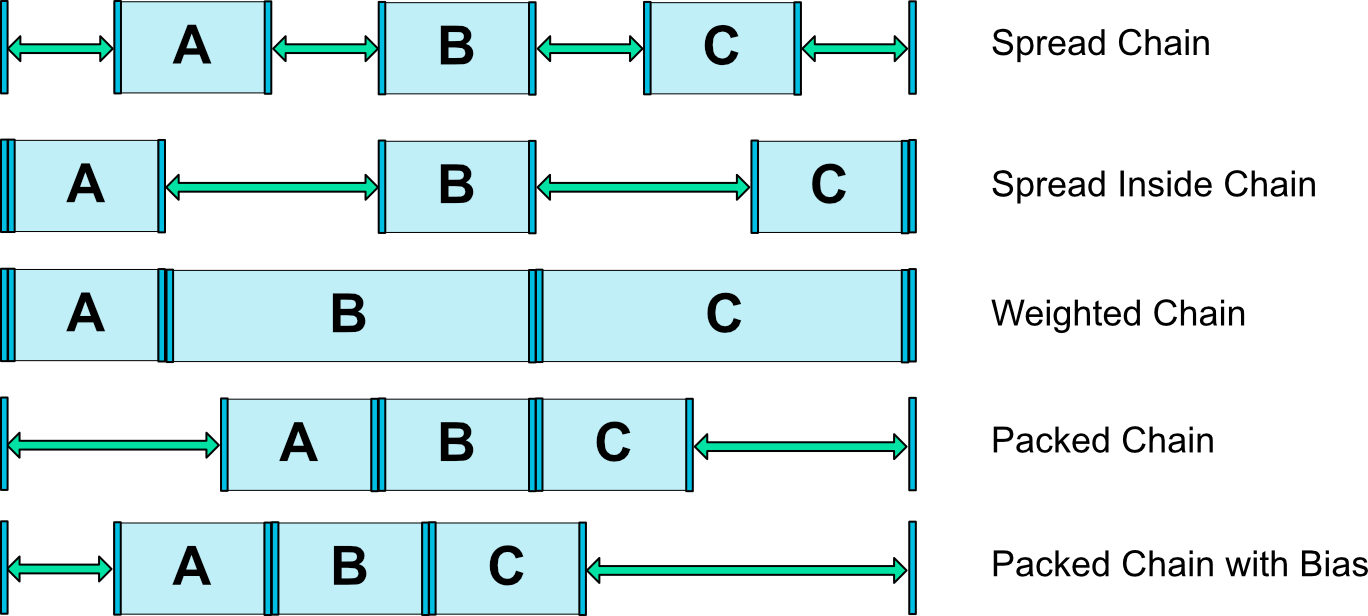
Fig. 11 - Chains Styles
어떻게 배치할 것인지 유용하게 사용될 수 있을 것 같습니다.
Virtual Helper objects
자세한 내용이 없어 원문으로 대체합니다.
In addition to the intrinsic capabilities detailed previously, you can also use special helper objects in ConstraintLayout to help you with your layout. Currently, the Guideline object allows you to create Horizontal and Vertical guidelines which are positioned relative to the ConstraintLayout container. Widgets can then be positioned by constraining them to such guidelines. In 1.1, Barrier and Group were added too.
Optimizer(in 1.1)
1.1 부터 app:layout_optimizationLevel 태그로 부여할 수 있습니다. 아직 실험 단계로 보여 지켜봐야할 것 같습니다. 이름 그대로 최적화에 관한 내용으로 추정됩니다.
- none : no optimizations are applied
- standard : Default. Optimize direct and barrier constraints only
- direct : optimize direct constraints
- barrier : optimize barrier constraints
- chain : optimize chain constraints (experimental)
- dimensions : optimize dimensions measures (experimental), reducing the number of measures of match constraints elements
Conclusion
Android에서 자주 사용되는 layout 4종류에 대해 간략히 알아봤습니다.
LinearLayout : 자식들이 단방향으로 일정한 순서로 배치될 때
RelativeLayout : 자식들의 위치가 서로에 관계가 있을 때
FrameLayout : 자식을 하나 정도 가지며 위치를 조정할 필요가 없고, 자식들이 서로 겹치도록 하고 싶을 때
ConstraintLayout : 복잡한 자식들의 위치나 크기 설정을 요구할 때
위와 같은 기준으로 적재적소에 layout을 사용할 수 있어야겠습니다.
'programming > android' 카테고리의 다른 글
| Thread with Handler & AsyncTask (0) | 2018.08.27 |
|---|---|
| View - RecyclerView (0) | 2018.08.26 |
| View - AppWidget (0) | 2018.08.23 |
| View - Widget (0) | 2018.08.23 |
| Companion Objects in Kotlin (0) | 2018.04.08 |