Kotlin Coroutines #1


reference: 

https://kotlinlang.org/docs/reference/coroutines.html

https://kotlinlang.org/docs/tutorials/coroutines-basic-jvm.html


 Coroutines

Android의 main thread에서는 UI 조작만을 권장하기 때문에(UI가 멈추는걸 좋아하는 사용자는 없겠죠), disk IO나 http request 같은 작업은 다른 thread로 부터 수행되어야 합니다. 일반적인 경우라면 thread with handler나 AsyncTask를 사용하게 될 텐데요, 이해는 됩니다만 적어야 하는 소스의 양이 많아 지죠. 이런 비동기 작업들을 좀 더 효율적으로 작성하기 위해 언어 차원에서 제공되는 기능으로 보입니다. 


 Suspend

여러 작업들을 하다보면 잠시 중단하여 다른 작업을 해야할 때가 있습니다. Coroutine은 thread 위에서 동작하며, thread를 block하지 않고 suspend합니다. Thread blocking 및 context switch는 비용이 비싸기 때문에 간단한 작업을 하려는 것에 비해 지나친 시간이 소요되곤 합니다. 반면 coroutine의 suspend는 거의 cost-free하다고 합니다.

(https://stackoverflow.com/questions/43021816/difference-between-thread-and-coroutine-in-kotlin)


 launch {}

간단한 예제로 실습해보았습니다.

@Test fun corountine_test() {
println("start")

// do things on default coroutine(shared pool of threads)
launch {
// delay doesn't stop the thread, but only suspends the coroutine itself (non-blocking)
// when coroutine is being suspended, the thread is returned to the pool till it's needed again
// and when coroutine is done waiting, it finds a free thread in the pool and resumes
delay(1000)
println("hello")
}

// when we want to do delay on main thread
runBlocking {
delay(2000)
}
println("stop")
}

Coroutine은 launch로 시작되며, 명시하지 않으면 기본적으로 shared thread pool의 임의의 thread에서 수행됩니다. 

delay()는 앞서 언급한 suspend의 기능을 수행합니다. Thread.sleep()의 전통적인 방식에 비해 매우 적은 자원을 소모하고, thread를 block하지 않습니다.

Coroutine이 suspend되면 수행되던 thread는 다시 pool로 반환되며, 필요해질 때 다시 불러진다고 합니다. Thread pool 관리 차원에서도 효율적이라고 볼수 있겠습니다. Suspend가 종료되면, 다시 pool에서 가용한 thread를 찾아 작업을 재개합니다.

또한 delay()는 coroutine에서만 사용할 수 있기 때문에, 일반적인 thread 상의 코드에서는 사용이 불가합니다. 따라서 위와 같이 runBlocking {}을 통해 호출하여야 합니다.


Cost

아래 예시로 coroutine의 효율을 간단하게 알아보았습니다:

@Test fun is_coroutine_cheaper() {
val c = AtomicInteger()
for (i in 1..1_000_000) {
launch {
c.addAndGet(i)
}
}
// not all of coroutines are completed, c is not what we expect
println(c.get())
}

위 코드의 수행시간은 1초 미만이었습니다. 100만개의 coroutine을 생성하여 작업하였으나 매우 적은 시간이 소요되었음을 알 수 있었는데요, thread로 수행한다면 분명 수 분의 시간이 소요됐을 것 같습니다.


 async {}

async {}는 기본적으로 launch {}와 같은 동작을 하지만 Deffered<T>를 반환합니다. (Deffered<T>는 아주 간단한 future라고 합니다)

@Test fun async_test() {
val deferred: List<Deferred<Int>> = (1..1_000_000).map { n ->
async {
delay(1000) // to make sure coroutines run parallel
n
}
}

runBlocking {
// await has to be called in coroutine
val sum = deferred.sumBy { it.await() }
println("sum : $sum")
}
}

위 예제는 앞서와 같이 100만개의 async {} 를 통한 coroutine을 수행하는 코드입니다. 다만 여기서의 차이점은 저 작업들이 완료되기까지 기다린다는 점인데요, await()를 통해 작업이 완료되기 까지 기다리게 하였습니다. 

100만개의 coroutine들이 과연 parallel하게 수행되는지 확인하기 위하여 각 작업마다 1초를 delay했습니다. 수행시간은 10초가 소요되지 않았습니다.

역시, coroutine의 기능은 coroutine 안에서 호출되어야 하므로 await()는 runBlocking {}안에서 수행했습니다. 


Suspend function

만약 위 예제에서 async {}안의 작업들을 하나의 함수로 표현하고 싶다면?

async {
workload(n)
}

fun workload(n: Int): Int {
delay(1000)
return n
}

위와 같은 코드가 될 것 같습니다. 하지만 앞서 말한 바와 같이, delay()는 coroutine의 기능이기 때문에 일반적인 함수에서는 호출이 불가합니다. 컴파일이 되지 않네요.

이럴 때 쓰는 것이 suspend 키워드입니다. fun 앞에 suspend를 붙이기만 하면 됩니다.


suspend fun workload(n: Int): Int {
delay(1000)
return n
}


'programming > android' 카테고리의 다른 글

기본적인 메모리 관리  (0) 2018.03.06
Splash 화면 구성하기  (3) 2018.02.20
Kotlin Coroutines #2  (0) 2018.01.28
Tools로 xml layoyt의 preview 제대로 표시하기  (0) 2018.01.22
Kotlin Standard Functions  (0) 2018.01.22

Tools on XML layout


reference: 

https://blog.stylingandroid.com/tool-time-part-1-2/?utm_source=Android+Weekly&utm_campaign=97507a2973-EMAIL_CAMPAIGN_2018_01_21&utm_medium=email&utm_term=0_4eb677ad19-97507a2973-338124565


RecyclerView 등과 같은 list는 런타임에서 모양이 정해지기 때문에, 

xml에 작성하면 preview 패널에선 무조건 vertical list로 표시되며 simple string의 dummy item 항목들이 보입니다.

실제 소스는 전혀 그렇지 않음에도 그렇게 표시된다면 상당히 불편하죠. 

그럴 때 쓰는게 Tools namespace입니다. 주요한(내가 쓸 것 같은) 것을 예제로 적었습니다.

Tools는 실제 구현과 무관하게 preview에서 어떻게 보여질 지만을 정해줌으로써

preview를 참고하여 디자인하는데 도움을 줍니다.


<android.support.v7.widget.RecyclerView
xmlns:tools="http://schemas.android.com/tools"
android:id="@+id/id_quiz_recycler"
android:layout_width="wrap_content"
android:layout_height="wrap_content"
android:orientation="horizontal"
app:layoutManager="android.support.v7.widget.LinearLayoutManager"
tools:listitem="@layout/card_quiz"
app:layout_constraintStart_toStartOf="parent"
app:layout_constraintEnd_toEndOf="parent"
app:layout_constraintTop_toTopOf="parent"
app:layout_constraintBottom_toBottomOf="parent" />

위 예제는 아래와 같은 preview를 갖습니다. 내가 지정한 임의의 layout(간단한 CardView)을 item으로 표시해줍니다.


이 외에도 

tools:text

tools:src

를 통해 preview를 보완할 수 있습니다.


앞으로는 ListView를 구현 할 때 레이아웃 변경 때 마다 빌드하여 확인할 일이 없으면 좋겠네요....


'programming > android' 카테고리의 다른 글

기본적인 메모리 관리  (0) 2018.03.06
Splash 화면 구성하기  (3) 2018.02.20
Kotlin Coroutines #2  (0) 2018.01.28
Kotlin Coroutines #1  (1) 2018.01.27
Kotlin Standard Functions  (0) 2018.01.22

Kotlin Standard Function


reference: 

https://android.jlelse.eu/mastering-kotlin-standard-functions-run-with-let-also-and-apply-9cd334b0ef84


Scoping function?

Kotlin에서 제공하는 standard library 중 scoping functions에 대해 소개합니다.


Simple example of "run"

fun test() {
var mood = "I am sad"

run {
val mood = "I am happy"
println(mood) // I am happy
}
println(mood) // I am sad
}


위 예제와 같이 사용한다면 분명 일반적인 scope의 역할 말고는 별다른 게 없어 보입니다. mood라는 같은 이름의 변수를 scope 별로 달리 사용할 수 있습니다. 하지만 아래의 예제는 조금 특별해 보입니다.

run {
if (firstTimeView) introView else normalView
}.show()


show()?? 갑자기 메소드를 호출했습니다. 이는 scope가 어떤 일련의 반환값을 갖는 메소드처럼 동작하는 것인데, 

return을 통하여 함수를 반환하는 것이 아니라 마지막 줄이 어떤 값을 반환하게 됩니다. 

따라서 위의 예제는 introView 혹은 normalView의 show()를 호출하는 것 입니다.


"with" & "T.run"

with(webview.settings) {
javaScriptEnabled = true
databaseEnabled = true
}
// similarly
webview.settings.run {
javaScriptEnabled = true
databaseEnabled = true
}


어떤 객체를 주체로 동작을 합니다. 

위 두 예제는 webview.settings를 주체로 어떠한 동작을 하는 것인데, 물론 scope안의 값들은 그 주체의 field입니다.

아래는 직접 실험해 본 소스입니다.


class ExampleUnitTest {
class AClass {
var foo = 1
}

@Test
fun test() {
val a = AClass()
val foo2 = a.run {
foo = 2
}
println("foo in a : ${a.foo}\nfoo2 : $foo2")
}
}
foo in a : 2
foo2 : kotlin.Unit

AClass 객체의 field를 T.run을 통해 조작한 후, 새로운 변수 foo2에 assign 하려고 했습니다. 

기본적으로 Kotlin에서는 assignment를 assignment로 사용할 수 없다는 걸 다시 깨달았죠...


아래 예제는 null check가 활용되는 예입니다. 아무래도 T?.run이 좀더 깔끔해보입니다. 

당연히, T가 null이면 run은 실행되지 않습니다.

// Yack!
with(webview.settings) {
this?.
javaScriptEnabled = true
this?.databaseEnabled = true
}
}
// Nice.
webview.settings?.run {
javaScriptEnabled = true
databaseEnabled = true
}


"let"


run이 기본적으로 this의 field나 method를 this가 생략된 형태로 접근하게 해주었으나, let에서는 lambda처럼 전달합니다. 

T.let에서 it는 T의 this로 쓰입니다. 


run : this as parameter

let : it as parameter

stringVariable?.run {
println("The length of this String is $length")
}
// Similarly.

stringVariable?.let {
println("The length of this String is ${it.length}")
}


"also"


also는 의미 그대로 이것 또한 해보라는 의미로 보입니다. 이는 standard function의 chain을 보면 확연히 알 수 있습니다.

let은 manipulated된 그대로 반환하여 reassign 하여 재사용하는 반면, 

also안의 it는 scope안에서 새롭게 생성된 같은 값의 temp 변수라고 볼 수 있겠습니다.

val original = "abc"
// Evolve the value and send to the next chain
original.let {
println("The original String is $it") // "abc"
it.reversed() // evolve it as parameter to send to next let
}.let {
println("The reverse String is $it") // "cba"
it.length // can be evolve to other type
}.let {
println("The length of the String is $it") // 3
}
// Wrong
// Same value is sent in the chain (printed answer is wrong)
original.also {
println("The original String is $it") // "abc"
it.reversed() // even if we evolve it, it is useless
}.also {
println("The reverse String is ${it}") // "abc"
it.length // even if we evolve it, it is useless
}.also {
println("The length of the String is ${it}") // "abc"
}
// Corrected for also (i.e. manipulate as original string
// Same value is sent in the chain
original.also {
println("The original String is $it") // "abc"
}.also {
println("The reverse String is ${it.reversed()}") // "cba"
}.also {
println("The length of the String is ${it.length}") // 3
}


"apply"


T.apply는 run과 비슷하지만 기본적으로 T의 this를 반환합니다. 아래 예제와 같이 객체 초기화에 간결히 사용될 수 있겠습니다.

// Improved approach, chaining
fun createIntent(intentData: String, intentAction: String) =
Intent().apply { action = intentAction }
.apply { data = Uri.parse(intentData) }


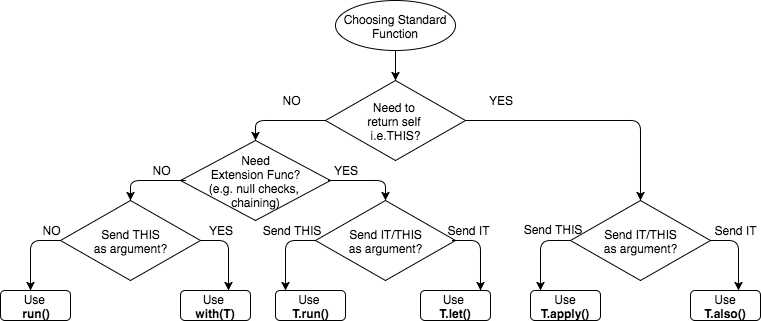
Function selection


무엇을 사용해야 할지 모르겠다면 아래 그림을 참고하면 됩니다. 음... 너무 많은데..?

익숙해진다면 멋있게 쓸 수 있을 것 같은 기능들이네요.


'programming > android' 카테고리의 다른 글

기본적인 메모리 관리  (0) 2018.03.06
Splash 화면 구성하기  (3) 2018.02.20
Kotlin Coroutines #2  (0) 2018.01.28
Kotlin Coroutines #1  (1) 2018.01.27
Tools로 xml layoyt의 preview 제대로 표시하기  (0) 2018.01.22

+ Recent posts